MySQL - Réplication Master-Master
Alasta 18 Mai 2016 database shell MySQL
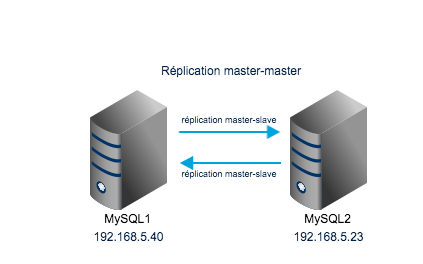
Description : Nous allons voir comment installer et configurer deux serveurs MySQL en réplication Master/Master ou Master/Slave, car le Master/Master n'est ni plus ni moins que deux réplications Master/Slave.
Description :
Nous allons voir comment installer la réplication MySQL entre deux serveurs en Master/Master.
Attention la configuration de réplication n’est valable que pour les serveurs MySQL en version < 5.5.
Lab :
Nous partirons d’une VM Centos 6.7 sans iptables.
Voici le schéma du lab :
Installation :
MySQL1 & MySQL2
Installation des composants :
yum install mysql-serverGestion du service :
chkconfig mysqld on

service mysqld start
Sécurisation à minima de la configuration :
/usr/bin/mysql_secure_installation


NOTE: RUNNING ALL PARTS OF THIS SCRIPT IS RECOMMENDED FOR ALL MySQL
      SERVERS IN PRODUCTION USE!  PLEASE READ EACH STEP CAREFULLY!


In order to log into MySQL to secure it, we'll need the current
password for the root user.  If you've just installed MySQL, and
you haven't set the root password yet, the password will be blank,
so you should just press enter here.

Enter current password for root (enter for none):
OK, successfully used password, moving on...

Setting the root password ensures that nobody can log into the MySQL
root user without the proper authorisation.

Set root password? [Y/n]
New password:
Re-enter new password:
Password updated successfully!
Reloading privilege tables..
 ... Success!


By default, a MySQL installation has an anonymous user, allowing anyone
to log into MySQL without having to have a user account created for
them.  This is intended only for testing, and to make the installation
go a bit smoother.  You should remove them before moving into a
production environment.

Remove anonymous users? [Y/n]
 ... Success!

Normally, root should only be allowed to connect from 'localhost'.  This
ensures that someone cannot guess at the root password from the network.

Disallow root login remotely? [Y/n]
 ... Success!

By default, MySQL comes with a database named 'test' that anyone can
access.  This is also intended only for testing, and should be removed
before moving into a production environment.

Remove test database and access to it? [Y/n]
 - Dropping test database...
 ... Success!
 - Removing privileges on test database...
 ... Success!

Reloading the privilege tables will ensure that all changes made so far
will take effect immediately.

Reload privilege tables now? [Y/n]
 ... Success!

Cleaning up...


All done!  If you've completed all of the above steps, your MySQL
installation should now be secure.

Thanks for using MySQL!
Configuration :
MySQL1
Ajouter les lignes suivantes à la directive [mysqld] de /etc/my.cnf :
#replication
server-id               = 10
log_bin                 = mysql-bin
binlog-ignore-db=information_schema
binlog-ignore-db=mysql
replicate-ignore-db=information_schema
replicate-ignore-db=mysql
On ne répliquera pas les DB information-schema et mysql.
Redémarrage du service :
service mysqld restartModification de MySQL en cli :
mysql -u root -p
Enter password:
Welcome to the MySQL monitor.  Commands end with ; or \g.
Your MySQL connection id is 2
Server version: 5.1.73-log Source distribution

Copyright (c) 2000, 2013, Oracle and/or its affiliates. All rights reserved.

Oracle is a registered trademark of Oracle Corporation and/or its
affiliates. Other names may be trademarks of their respective
owners.

Type 'help;' or '\h' for help. Type '\c' to clear the current input statement.

mysql> create user 'replication_user'@'%' identified by 'mypassword';
Query OK, 0 rows affected (0.00 sec)

mysql> grant replication slave on *.* to 'replication_user'@'%';
Query OK, 0 rows affected (0.00 sec)

mysql> show master status;
+------------------+----------+--------------+--------------------------+
| File             | Position | Binlog_Do_DB | Binlog_Ignore_DB         |
+------------------+----------+--------------+--------------------------+
| mysql-bin.000001 |      357 |              | information_schema,mysql |
+------------------+----------+--------------+--------------------------+
1 row in set (0.00 sec)
Une fois connecté au serveur MySQL, nous avons créé un utilisateur dédié à la réplication (replication_user) avec un mot de passe (mypassword).
Puis nous l’avons autorisé pour la réplication, ici nous n’avons pas restreint les databases et l’IP du serveur MySQL2.
La dernière commande nous donne des informations sur le fichier et la position qui seront à fournir sur MySQL2 lors de la réplication.
MySQL2
Ajouter les lignes suivantes à la directive [mysqld] de /etc/my.cnf :
#replication
server-id               = 20
log_bin                 = mysql-bin
binlog-ignore-db=information_schema
binlog-ignore-db=mysql
replicate-ignore-db=information_schema
replicate-ignore-db=mysql
Redémarrage du service :
service mysqld restartModification de MySQL en cli :
mysql -u root -p
Enter password:
Welcome to the MySQL monitor.  Commands end with ; or \g.
Your MySQL connection id is 2
Server version: 5.1.73-log Source distribution

Copyright (c) 2000, 2013, Oracle and/or its affiliates. All rights reserved.

Oracle is a registered trademark of Oracle Corporation and/or its
affiliates. Other names may be trademarks of their respective
owners.

Type 'help;' or '\h' for help. Type '\c' to clear the current input statement.

mysql> create user 'replication_user'@'%' identified by 'mypassword';
Query OK, 0 rows affected (0.00 sec)

mysql> grant replication slave on *.* to 'replication_user'@'%';
Query OK, 0 rows affected (0.00 sec)

mysql>  slave stop;
Query OK, 0 rows affected, 1 warning (0.00 sec)

mysql> CHANGE MASTER TO MASTER_HOST = '192.168.5.40', MASTER_USER = 'replication_user', MASTER_PASSWORD = 'mypassword', MASTER_LOG_FILE = 'mysql-bin.000001', MASTER_LOG_POS = 357;
Query OK, 0 rows affected (0.04 sec)

mysql> slave start;
Query OK, 0 rows affected (0.00 sec)

mysql> show master status;
+------------------+----------+--------------+--------------------------+
| File             | Position | Binlog_Do_DB | Binlog_Ignore_DB         |
+------------------+----------+--------------+--------------------------+
| mysql-bin.000001 |      357 |              | information_schema,mysql |
+------------------+----------+--------------+--------------------------+
1 row in set (0.00 sec)
Dans la commande CHANGE MASTER …, nous avons fourni les informations récupérées des commandes sur MySQL1.
Ici il faut récupérer les informations File et Position pour les prochaines commandes sur MySQL1, dans notre exemple les valeurs sont identiques mais ce n’est pas forcément le cas.
Note : A ce stade nous avons une réplication master(Mysql1)-slave(MySQL2)
MySQL1
Modification de MySQL en cli :
slave stop;
Query OK, 0 rows affected, 1 warning (0.00 sec)

mysql> CHANGE MASTER TO MASTER_HOST = '192.168.5.23', MASTER_USER = 'replication_user', MASTER_PASSWORD = 'mypassword', MASTER_LOG_FILE = 'mysql-bin.000001', MASTER_LOG_POS = 357;
Query OK, 0 rows affected (0.03 sec)

mysql> slave start;
Query OK, 0 rows affected (0.00 sec)
Tests de réplications Master-Master :
Les tests se feront en CLI, mais il est tout à fait faisable de les faire avec phpMyAdmin ou tout autre outils.
MySQL1
mysql> show databases;
+--------------------+
| Database           |
+--------------------+
| information_schema |
| mysql              |
+--------------------+
2 rows in set (0.00 sec)

mysql> create database DB_CreateOnMySQL1;
Query OK, 1 row affected (0.00 sec)

mysql> show databases;
+--------------------+
| Database           |
+--------------------+
| information_schema |
| DB_CreateOnMySQL1  |
| mysql              |
+--------------------+
3 rows in set (0.00 sec)

mysql> create table DB_CreateOnMySQL1.tableOn1 (`id` varchar(10));
Query OK, 0 rows affected (0.02 sec)

mysql> use DB_CreateOnMySQL1
Database changed
mysql> show tables;
+-----------------------------+
| Tables_in_DB_CreateOnMySQL1 |
+-----------------------------+
| tableOn1                    |
+-----------------------------+
1 row in set (0.00 sec)
MySQL2
On va vérifier la réplication MySQL1 vers MySQL2
mysql> show databases;
+--------------------+
| Database           |
+--------------------+
| information_schema |
| DB_CreateOnMySQL1  |
| mysql              |
+--------------------+
3 rows in set (0.00 sec)

mysql> use DB_CreateOnMySQL1
Reading table information for completion of table and column names
You can turn off this feature to get a quicker startup with -A

Database changed
mysql> show tables;
+-----------------------------+
| Tables_in_DB_CreateOnMySQL1 |
+-----------------------------+
| tableOn1                    |
+-----------------------------+
1 row in set (0.00 sec)
On va faire des Modifications à la base existant et créer une nouvelle DB :
mysql> create table tableOn2 (`id` varchar(10));
Query OK, 0 rows affected (0.03 sec)

mysql> show tables;
+-----------------------------+
| Tables_in_DB_CreateOnMySQL1 |
+-----------------------------+
| tableOn1                    |
| tableOn2                    |
+-----------------------------+
2 rows in set (0.00 sec)

mysql> create database DB_CreateOnMySQL2;
Query OK, 1 row affected (0.00 sec)

mysql> show databases;
+--------------------+
| Database           |
+--------------------+
| information_schema |
| DB_CreateOnMySQL1  |
| DB_CreateOnMySQL2  |
| mysql              |
+--------------------+
4 rows in set (0.00 sec)

mysql> create table DB_CreateOnMySQL2.table2On2 (`id` varchar(10));
Query OK, 0 rows affected (0.01 sec)

mysql> use DB_CreateOnMySQL2
Reading table information for completion of table and column names
You can turn off this feature to get a quicker startup with -A

Database changed
mysql> show tables;
+-----------------------------+
| Tables_in_DB_CreateOnMySQL2 |
+-----------------------------+
| table2On2                   |
+-----------------------------+
1 row in set (0.00 sec)
MySQL1
Nous allons vérifier que les données sont bien répliquées :
mysql> show databases;
+--------------------+
| Database           |
+--------------------+
| information_schema |
| DB_CreateOnMySQL1  |
| DB_CreateOnMySQL2  |
| mysql              |
+--------------------+
4 rows in set (0.00 sec)

mysql> use DB_CreateOnMySQL2
Reading table information for completion of table and column names
You can turn off this feature to get a quicker startup with -A

Database changed
mysql> show tables;
+-----------------------------+
| Tables_in_DB_CreateOnMySQL2 |
+-----------------------------+
| table2On2                   |
+-----------------------------+
1 row in set (0.00 sec)
Conclusion :
Nous avons vu comment faire une réplication master-master, dans un autre billet nous verrons comment forcer une réplication en cas de soucis.